
This lesson is made with PSPX9
But is good with other versions.
© by SvC-Design

Materialen Download :
Here
******************************************************************
Materials:
Astrid masker 134
Narah_Mask_1091
PinkRibbon 1
PinkRibbon 2
Woman1_AI Generated KeDe
******************************************************************
Plugin:
Effects – plugin - Medhi - Sorting Tiles
Effects – plugin - AP [Lines] -Lines SilverLining - Backslash
******************************************************************
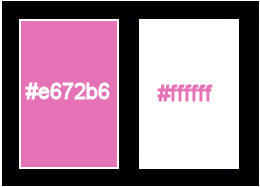
color palette
:
******************************************************************
methode
When using other tubes and colors, the mixing mode and / or layer coverage may differ
******************************************************************
General Preparations:
First install your filters for your PSP!
Masks: Save to your mask folder in PSP, unless noted otherwise
Texture & Pattern: Save to your Texture Folder in PSP
Selections: Save to your folder Selections in PSP
Open your tubes in PSP
******************************************************************
We will start - Have fun!
Remember to save your work on a regular basis
******************************************************************
1
Foreground color #e672b6
Background color #ffffff
Open a new transparent image of 900 x 500 pixels
Fill with the color #e6782b6
2
Selections - Select all
Layers - New raster layer
3
Open Woman1_AI Generated KeDe
Edit – Copy
Edit - Paste into selection
Selection - Select None
4
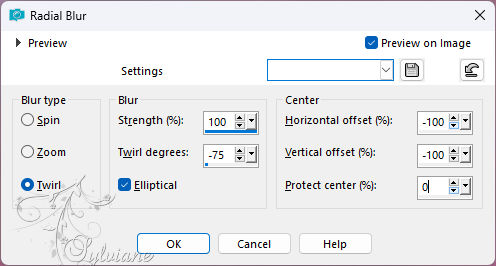
Adjust - Blur - Radial blur
Adjust – one step photo fix
5
Layers - Duplicate
Image - Mirror – mirror Horizontal
Blend mode : Overlay
Opacity 65
(Adjust the blend mode to your own color)
6
Layers - Merge - Merge down
Adjust – scharpness – scharpen
7
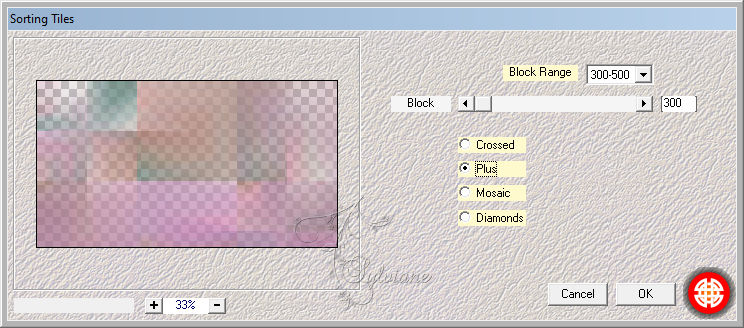
Effects – plugin - Medhi - Sorting Tiles
Effects - Edge Effects - Enhance
8
Effects – plugin - Medhi - Sorting Tiles
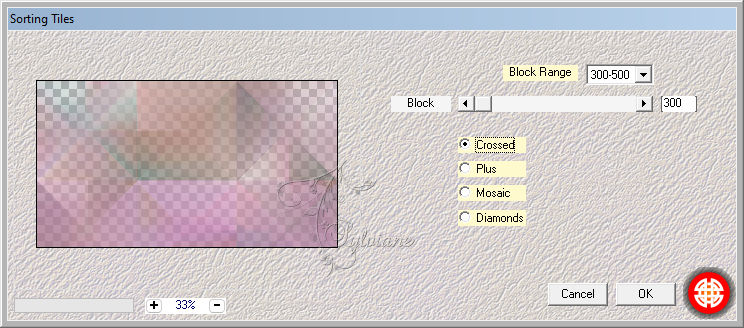
Effects - Edge Effects - erode
9
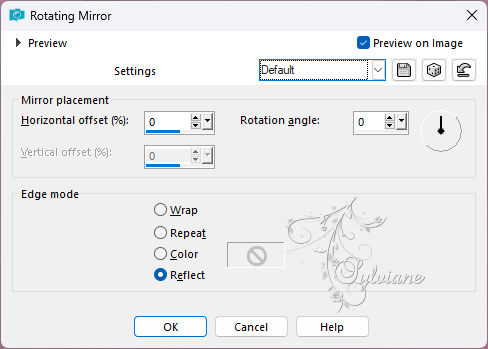
Effects - Reflection Effects - Rotating Mirror - Default
10
Layers - New raster layer
Fill with the color #ffffff
11
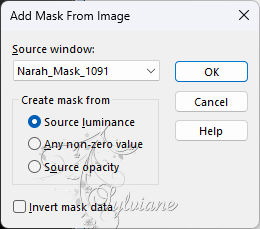
Layers - New Mask Layer - From Image - Narah_Mask_1091
Layers - Merge - Merge group
Image - Mirror - Vertical Mirror
Image - Mirror – mirror Horizontal
12
Effects - Texture Effects – wave
Layers - Properties - Blend mode Luminance (old)
Opacity 65
13
Layers - New raster layer
Fill with the color #ffffff
14
Layers - New Mask Layer - From Image - Astrid masker 134
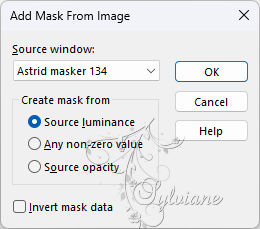
Layers - Merge - Merge group
Image - Mirror – mirror Horizontal
Layers - Properties - Blend mode Overlay
Opacity 50
15
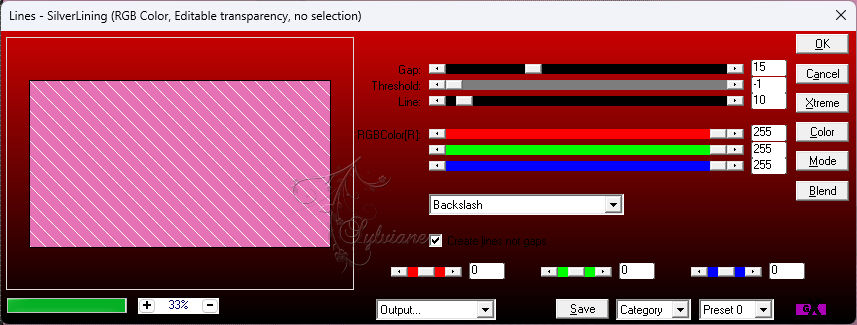
Layer palette - Activate bottom layer
Effects – plugin - AP [Lines] -Lines SilverLining - Backslash
16
Image - Add Borders – Symmetric -1 pixel - color#e672b6
Image - Add Borders – Symmetric -50 pixels - color #ffffff
17
Selections - Select all
Selections - Modify - contract 25 pixels
18
Layers - New raster layer
Flood fill with color#e672b6
Selection - modify - contract - 5 pixels
19
Hit Delete on the keyboard
Selection - Select None
20
Image - Add Borders – Symmetric -5 pixels - color #e672b6
Selections - Select all
Image - Add Borders – Symmetric -50 pixels - color #ffffff
Effects - 3D Effects - Drop shadow
0 / 0 / 45 / 25 / color #000000
Selection - Select None
21
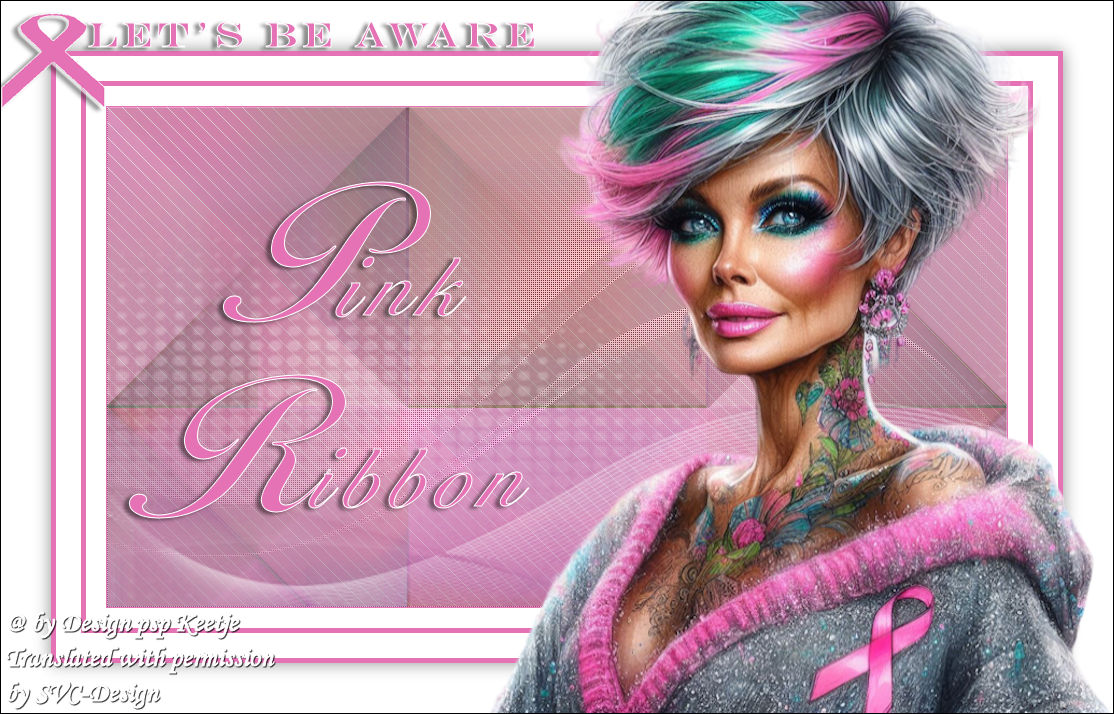
Open Woman1_AI Generated KeDe
Edit – Copy
Edit - Paste as new layer
Image - Resize - 85%
No check mark on resize all layers
Move to the right
22
Open PinkRibbon 1
Edit – Copy
Edit - Paste as new layer
Move to the left
Effects - 3D Effects - Drop shadow
2 / min 5 / 45 / 5 - color #000000
23
Open PinkRibbon 2
Edit – Copy
Edit - Paste as new layer
Place on top of the border
Effects - 3D Effects - Drop shadow
2 / min 5 / 45 / 5 - color #000000
24
Place your Name - Watermark
Image - Add Borders – Symmetric - 1 pixel color #000000
Image - Resize - Change width to 1000 pixels
Save as Jpeg
Back
Copyright Translation 2024 by SvC-Design
------------------------------------------------------------------------------
Thanks to all who created